In this blog post, we will build a simple website to demonstrate some of the most important features of Next.js, a React-based framework, as well as take advantage of the latest features introduced in Next.js version 14.
How to get the most out of this tutorial
In this tutorial, we will focus on the main steps we took to create a simple website using Next.js features. We won’t go into detail about styling React components.
By the end of this tutorial, you will understand the main Next.js features and benefits. You will also receive a basic website skeleton that you can expand and adapt to meet your specific requirements.
If you want to follow along, you can clone this repository and use it as a reference or to copy paste components into your project (we will start from scratch).
Introduction
Our example website will have 3 pages or routes:
- the landing page
- the services page
- the contact page
Let us name this website “Web Lords” and create a new Next.js project:
$ npx create-next-app web-lordsWe keep the default options like displayed bellow:

This will create a sample Next.js project with:
- TypeScript instead of plain JavaScript
- ESLint as a linter
- Tailwind CSS for styling
- The app router, a new routing mechanism that comes with Next.js version 14.
Now go ahead and run the development server:
$ cd web-lords
$ npm run dev
This will compile the home directory (/ route), the per-default created route, prepare the resources, and launch the development server at port 3000.

If we visit http://localhost:3000/ we will see the default Next.js landing page:

As the text in the upper left corner suggests “Get started by editing app/page.tsx”, our first step should be to change the content in page.tsx inside the app directory.
The app router
A new feature that came with the Next.js version 14 is the app router.
The concept is straightforward and intuitive. We create all of our routes in the app folder. To define a route, simply create a folder with the route name and place a page.tsx component inside.
If we create a folder without a page.tsx component inside, it is not considered a route; this is useful if we want to organize the project with folders other than routes, such as UI components.
In our example we need 3 routes:
- /, for the landing page
- /services, for the offered services page
- /contact, for the contact page
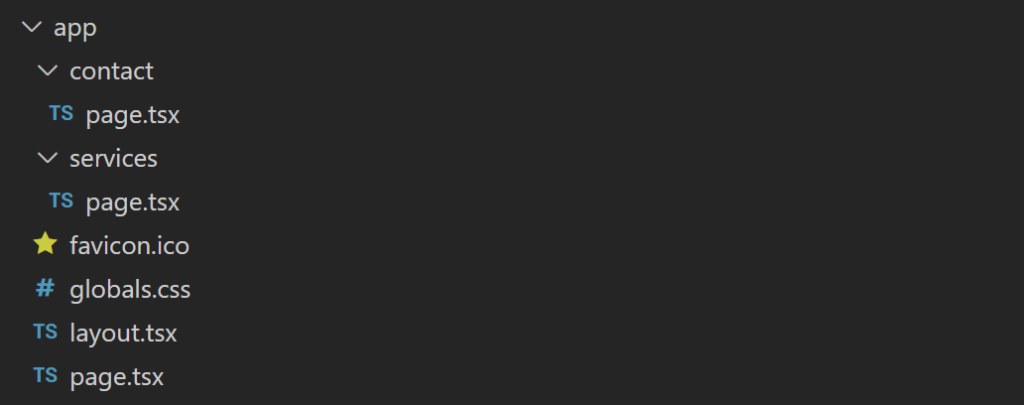
For this reason, we should create two folders called “services” and “contact” inside the app directory and create a page.tsx for each:

Inside the page.tsx files we export a simple React component that looks like this:
export default function PageComponent() {
  return (
    <main>
      <h1>Some text</h1>
    </main>
  );
}
Instead of PageComponent we have Home, Contact and Services and instead of “Some text”, we have “Landing page”, “Services page” and “Contact page”.
To test our changes, visit each route:
- in http://localhost:3000/ we should see the text “Landing page”
- in http://localhost:3000/services we should see the text “Services page”
- in http://localhost:3000/contact the text “Contact page”
If we visit a route that does not exist (for example http://localhost:3000/about) we will see the default 404 page:

We can also navigate back and forth the browser history, this means that we have a fully functional routing mechanism in just a few steps!
Code splitting
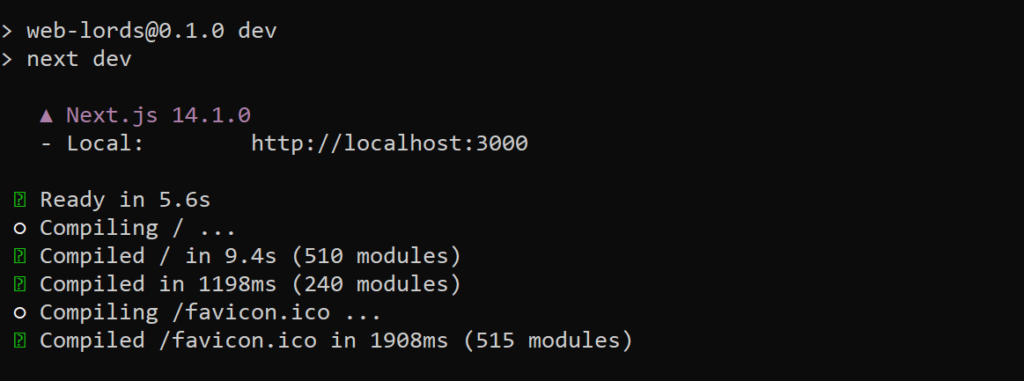
If we take a look at the logs, we will notice that the development server compiled every route after we visited it:

This is due to automated code splitting and prefetching. Unlike traditional React SPA, where the entire app is initially loaded, Next.js divides the code into different routes and only fetches the code when we visit a route, resulting in faster loading times.
Another example of a route’s code being prefetched is when a special Link component references this route. In that case, if there is a link to the contact page on the home page, the contact page is prefetched in the background, so the code is already present when we click on the link:
import Link from "next/link";
<Link href="/contact">Contact</Link>
Tailwind CSS out of the box
We used the “create-next-app” command to create a new Next.js app that already included Tailwind CSS. Tailwind is a CSS framework that allows us to apply styles with meaningful class names such as flex, px-4, and items-center. Those who are used to writing traditional CSS (including myself) may find it strange at first, but after some practice, you will enjoy it.
After deleting the colors applied for the body element in global.css, we will define our own colors in the main tailwind config file (tailwind.config.ts):
theme: {
  extend: {
    colors: {
      "primary-light": "#6750A4",
      "on-primary-light": "#FFFFFF",
      "primary-dark": "#D0BCFF",
      "on-primary-dark": "#381E72",
    },
  },
},
By doing so, we can use semantic class names like bg-primary-light dark:bg-primary-dark (for dark mode) to apply those custom colors in React components:
<body className="bg-primary-light dark:bg-primary-dark">...</body>
Fonts optimization and cumulative layout shift
Another important feature of Next.js is font optimization. With the “next/font” module, Next.js downloads the font files at build time and stores them alongside other static assets.
By doing so, fonts are shipped alongside other static assets on a website, such as HTML files, and no additional network request is required to download them. This prevents the cumulative layout shift caused by font loading.
The cumulative layout shift occurs when the fonts are not yet loaded, and then the layout changes, resulting in a shift in the layout. It is one of the most important metrics for evaluating website performance.
It is also extremely simple to use fonts with Next.js. All we need to do is create a Typescript file to host our fonts and then use them. In our example, we will create a fonts.ts file within the UI folder:
import { Lusitana, Permanent_Marker } from "next/font/google";

export const lusitana = Lusitana({
  weight: ["400", "700"],
  subsets: ["latin"],
});

export const marker = Permanent_Marker({ weight: "400", subsets: ["latin"] });
This way, we can now use the fonts like class names:
<p className={`${lusitana.className}>...</p>
The page layout and partial rendering
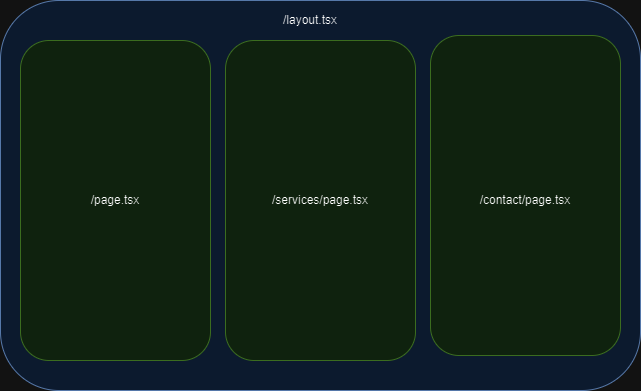
You may have noticed a layout.tsx component in our app folder. This is a special Next.js component that handles things that are shared by multiple components.
The content of this component is behaving like a frame. This frame is inherited to the sub routes.
In our example this means that the home route and the contact and services routes, will all inherit the contents of the layout.tsx as a frame, like depicted bellow:

When we load any of the home, contact, or services routes, the layout component’s content is already present and does not need to be rendered again. This is another concept in Next.js called partial rendering.
In this case, we’ll use the layout component to share the navigation bar. We declare the NavigationBar component in the root layout, which is located in app/layout.tsx.
export default function RootLayout({
  children,
}: Readonly<{
  children: React.ReactNode;
}>) {
  return (
    <html lang="en">
      <body
        className={`${lusitana.className} bg-primary-light dark:bg-primary-dark text-on-primary-light dark:text-on-primary-dark`}
      >
        <NavigationBar />
        {children}
      </body>
    </html>
  );
}
You can find the NavigationBar component inside the UI folder of the project repo.
In this root layout we can also notice how we defined global fonts and colors:
className={`${lusitana.className} bg-primary-light dark:bg-primary-dark text-on-primary-light dark:text-on-primary-dark`}
Adding meta data for SEO
Last but not least, we will define some meta data for our website in the same root layout file:
export const metadata: Metadata = {
  title: "Web Lords",
  description: "Create your new website",
};
Meta data is important for SEO because it makes a website readable and accessible to search engines and social media. Proper meta data enables search engines to find your website using the appropriate search terms, thereby expanding your audience.
In our example, we set the page title and description. The title is clearly visible in the browser tab.
Conclusion
In this tutorial we demonstrated some of the most important Next.js features, that helped us building a simple website, those features are:
- Routing with the new app router.
- Code splitting.
- Tools like Tailwind CSS included out of the box.
- Fonts optimization.
- Partial rendering.
- Meta data for SEO.
Using only those features, you can create a wide variety of websites. Even better, Vercel allows you to deploy Next.js apps with a few clicks!
